

Tools For Scale Modeling 2 — Intermediate Level Tools
By now, you've successfully built several kits, and your passion for scale modeling is evident. You're ready to step up your game with more complex kits and strive for more polished and realistic results. This requires more than basic skills — it's about refining your techniques and upgrading your tools.
The rest of the series can be found here:
- Tools For Scale Modeling 1 — Basic Level
- Tools For Scale Modeling 3 — Advanced and Niche Tools (coming soon)
Let's break down such tools by following the process of the construction of the model.
Cutting — Upgrading From the Hobby Knife
As we detailed in the first article of this series, a simple hobby knife can be used at the beginner level to cut parts from the sprue. While this works, it often leaves rough edges, can damage delicate parts, or causes stress marks on plastic pieces.
To achieve more polished results, you'll need something that offers more precision and control to maintain the integrity of your parts.
The first essential upgrade. Regular side cutters allow you to cleanly cut parts from the sprue, reducing the chance of damaging thin or fragile pieces.
For even finer work, single-blade nippers can remove sprue gates and nubs without crushing the part, leaving less material to sand away afterward.
Sanding and Filing — Refining Your Parts
Once your parts are cut from the sprue, or even when you already have some subassemblies glued together, it's time to refine them by removing mold lines, seams, and leftover nubs. For this, a variety of sanding and filing tools are essential to smooth out imperfections and prepare parts for assembly and painting.
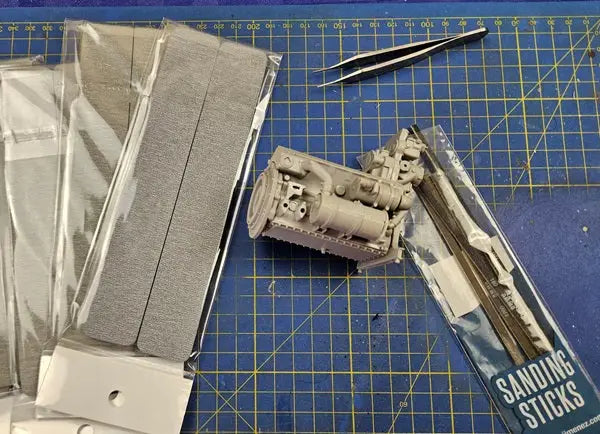
Flexible and can reach tight corners. Come in various grits and sizes for both small, delicate parts and larger surfaces.
Offer more aggressive material removal for tougher seams.
Perfect for refining curved or uneven surfaces. Their pliable texture conforms to the shape of your model, providing an even, smooth finish without flattening out details.
Drilling — Electric Mini Drill
You may find yourself needing to modify parts or create small holes for better detail and realism. While manual drills work for basic tasks, an electric option offers more versatility and control for complex projects.
Besides drilling, an electric mini drill is a versatile tool also useful for grinding and sanding down areas, speeding up the process and providing more consistent results than manual tools.
Handling Small Parts — Tweezers and PE Pliers
As kits become more complex, you'll encounter smaller, more delicate parts that require careful handling. The kit may also include small frets of photo-etched (PE) parts.
Precision tweezers
A must-have for handling tiny parts without bending or damaging them. Fine tips allow for delicate placement of decals, little plastic pieces, and PE components.
PE bending pliers
Designed specifically for bending small photo-etched parts. They ensure clean, controlled bends without damaging the thin metal, which is crucial for fitting PE parts onto the model accurately.
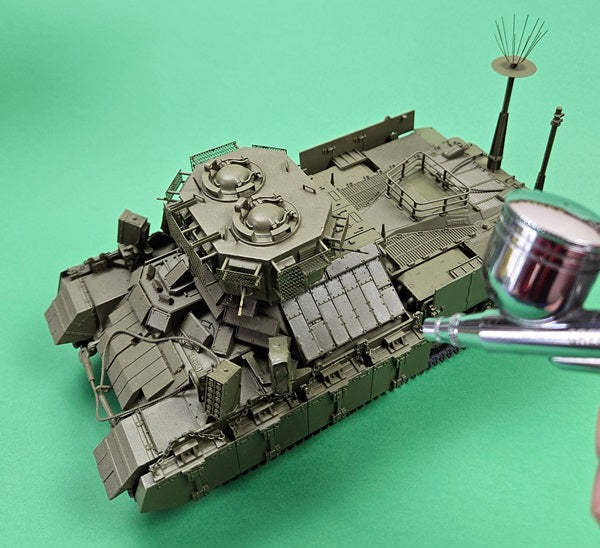
Painting — The Airbrush Advantage
When it comes to painting, using a brush is fine for beginners, but airbrushing offers a far superior finish, allowing for smooth, even coats of paint that brush strokes can't achieve. An airbrush is one of the most important tools to invest in as you advance in scale modeling.
Key advice: For intermediate modelers, a dual-action airbrush is highly recommended. It gives you greater control by allowing you to adjust both the amount of paint and the airflow simultaneously. This makes it easier to create fine lines, gradients, and smooth transitions between colors.
Look for one with a comfortable grip and a durable design, as you'll be using this tool frequently. It should also be easy to disassemble and clean, as keeping your airbrush in optimal condition is key to getting consistently great results.
Equally important is a compressor that can deliver a steady, adjustable airflow. A good compressor should have a built-in moisture trap to prevent condensation from affecting the paint application, which can cause splattering or inconsistencies. The ability to adjust the air pressure is crucial for different painting techniques — higher pressures for large areas, and lower pressures for finer details or delicate work.
Choose a compressor with a quiet motor, especially if you plan on doing longer painting sessions, and ensure it has a tank to provide consistent pressure.
Decals — Precision Cutting
Decals are often the final touch on a model, and placing them correctly is crucial to the overall appearance. Poorly cut decals can leave uneven edges, which can ruin the aesthetic of an otherwise well-built model.
To avoid this, use stainless steel decal scissors. These are specifically designed for cutting small, intricate decals with precision, ensuring a smooth, clean edge. Stainless steel prevents corrosion, meaning they'll stay sharp and effective over time.
Weathering — Bringing Your Model to Life
The final stage of model building is where you can really bring your kit to life. Weathering techniques allow you to simulate wear, dirt, and other environmental effects, making your model look more realistic and lived-in.
This step is what distinguishes intermediate modelers from beginners.
Essential for applying washes, pigments, and other weathering effects. Fine-tipped brushes allow for precision work when applying pin washes to recessed panel lines, while flat brushes are great for applying larger areas of pigments or dry brushing.
Fans or saw-shaped brushes are perfect for replicating streaks and other effects.
A dedicated set will help you highlight the raised details on your model, enhancing textures and making details pop. This simple technique can add a layer of realism that makes the model appear naturally aged or worn.
Bottom line: By upgrading your toolkit with these intermediate-level tools, you'll be able to enhance every stage of your scale modeling process, from assembly to finishing. The right tools can transform a good model into a masterpiece.


