

How to Remove Nub Marks on Gunpla: The Method That Actually Works
Two cuts, the right sanding sequence, and one specific type of nipper. That's all it takes to make nub marks disappear completely.
Why Nub Marks Happen (And Why They Won't Sand Away)
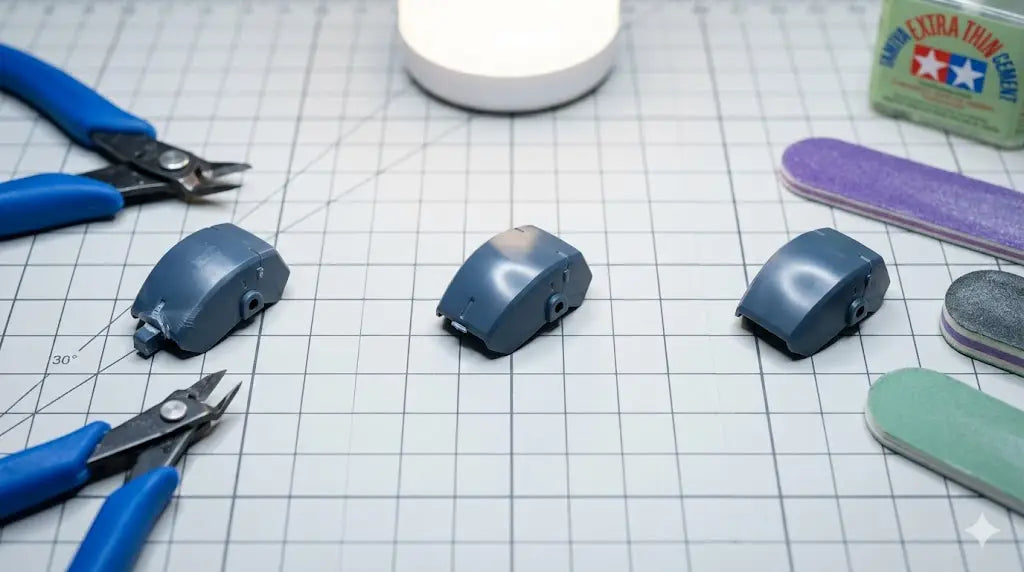
When you clip a part directly from the runner, the cutting pressure stresses the plastic around the gate. This stress causes two problems: a raised nub where the sprue was connected, and a white discoloration in the plastic beneath it — what builders call a stress mark.
The white mark isn't on the surface. It's in the plastic itself, caused by the molecular structure of the ABS or PS deforming under the blade's pressure. That's why you can sand forever and still see it — if you cut incorrectly in the first place, you're trying to fix a structural problem with a surface solution.
Most builders focus on the raised nub. The actual problem is the stress mark underneath it. Get the cut right, and sanding becomes a 60-second cleanup. Get the cut wrong, and no amount of sanding will fully fix the result.
The Two-Cut Method: How to Remove Gunpla Nub Marks at the Source
The two-cut method is standard practice among experienced builders, and it's the single most effective way to eliminate nub marks before they form. It adds about three seconds per part. It's worth it.
First cut: leave 2–3mm of sprue attached
Don't cut flush on the first pass. Leave a small stub — roughly 2–3mm of sprue still attached to the part. This absorbs the blade stress and keeps it away from the part's actual surface. The part is now free from the runner with a small nub sticking out.
Second cut: clip the stub flush or slightly proud
Now clip the remaining stub as close to the part's surface as possible. Slightly proud is better than flush, because you'll sand the last fraction down. At this point the blade stress lands exactly at the gate — the thickest, most resilient area of the part.
Inspect before sanding
Check the nub area under a direct light source. If you still see white stress marks after a correct two-cut sequence, your nipper blades are dull or too thick. A sharp, single-blade nipper minimizes lateral pressure and is the only tool that removes gunpla nub marks cleanly at this stage without stress.
Orient your nipper so the flat side of the blade faces the part, not the runner. The flat side creates less lateral pressure on the plastic, which directly reduces stress marks at the gate.
How to Sand Nub Marks: The Correct Grit Sequence
Once you've made a clean two-cut, the remaining nub is minimal — a small raised area that needs to be leveled flush with the part's surface. The sequence matters. Don't skip grits.
| Step | Grit | Purpose | Best Tool |
|---|---|---|---|
| 1 | #400 | Level the nub flush with the surface | Rigid sanding stick or matchstick |
| 2 | #800 | Remove #400 scratches, smooth the area | Flexible sanding stick |
| 3 | #1500 | Refine the surface, reduce visible marks | Flexible sanding stick |
| 4 | #2000+ | Final polish before paint or topcoat | Sanding sponge or fine matchstick |
Going straight from #400 to #2000 leaves scratches that show through paint — each grit exists to remove the marks left by the previous one. Sand in one consistent direction where possible, and check progress frequently by holding the part at an angle under a lamp. The nub area should become less visible with each step.
If you're still seeing a white mark after #1500, you have one of two problems: either a stress mark from a bad first cut that sanding alone won't fix, or you haven't fully leveled the nub in step 1. Go back to #400 and confirm the surface is actually flat before progressing.
Use flexible sanding sticks on curved surfaces. A rigid stick will flatten rounded panel areas and create flat spots that look wrong under any finish.
Four Mistakes That Leave White Stress Marks
Clipping flush in a single cut. This is the most common error. One cut straight to the gate concentrates all blade stress directly on the part's surface, which almost guarantees a white mark in standard plastic nippers.
Using worn or cheap nippers. Thick blades require more force, which means more stress transferred to the plastic. A nipper on its 300th part is not the same tool it was on its first. The blade gap matters as much as the technique.
Skipping to fine grits too early. Starting at #800 when there's still a raised nub means you're polishing a bump instead of removing it. Start at #400 and don't move on until the surface is genuinely flat under your fingernail.
Sanding too wide an area. Pressing the stick flat and rubbing in circles blurs the surrounding panel detail. Keep your sanding precise — work only over the nub area, not the entire panel face.
When an Electric Sander Makes Sense for Nub Removal
For HG and RG kits, hand sanding with a sanding stick is the right tool. But if you're building large MG or PG kits with hundreds of parts, or you're doing production-level builds where surface consistency matters across every single part, an electric reciprocating sander changes the math considerably.
Hand Sanding
Best for HG, RG, and SD kits. Small or highly curved parts. One-off builds where you want full tactile control. No additional investment beyond sanding sticks.
Electric Sander
Best for MG, PG, and large-scale builds. High part counts where consistency matters. Builders who work regularly and want faster, more repeatable results.
The DSPIAE ES-A electric reciprocating sander uses a back-and-forth motion rather than rotational, which gives precise control on small surfaces and significantly reduces the risk of over-sanding. It's covered in full detail in the DSPIAE ES-A review if you want to see it in context before buying.
For builders working on thinner plastic or high-detail parts, the ES-A PRO adds variable speed control — useful when you need to work at lower intensity on delicate areas without losing the sander's precision.
Either way, the fundamentals don't change: two-cut first, then sand with a proper grit progression. The electric sander speeds up the sanding stage. It doesn't fix a bad cut.
Everything mentioned in this guide — verified and available in the store.
DSPIAE ST-C2 Single Blade Side Cutter
Single-blade design minimizes stress transfer to the plastic. The right nipper for clean two-cut technique on Gunpla gates — removes nub marks before they form.
View ProductFlexible Acrylic Sanding Sticks
Flexible backing conforms to curved surfaces. Ideal for the #800–#2000 stages of nub removal without flattening panel contours.
View ProductDSPIAE ES-A Electric Reciprocating Sander
Reciprocating motion for precise control on small surfaces. The practical choice for MG and PG builders who want consistent results across high part counts.
View ProductDSPIAE ES-A PRO
Variable speed and refined motion for detail work on thin plastic. Best choice for high-grade builds where precision on small parts matters.
View Product


