

Set Up the DSPIAE Wash-Free Airbrush: A Complete Step-by-Step Guide
Setting up a siphon-feed airbrush is not quite the same as preparing a typical gravity-feed dual-action airbrush modelers are used to. The DSPIAE Wash-Free Airbrush uses a bottom-feed paint bottle, a single-action trigger, and a suction system that draws paint up through a tube
If it's the first time you're using a siphon-feed airbrush, this guide will walk you through exactly how to prepare it, why each step matters, and how to avoid the most common mistakes that lead to poor spray performance.
What Makes Siphon-Feed Airbrushes Different?
Before diving into the setup steps, it's worth understanding how this type of airbrush works.
Unlike gravity-feed airbrushes, which rely on paint naturally falling into the nozzle, siphon-feed (sometimes called "suction-feed") systems use a vacuum created by fast-moving air to pull paint up through a tube inserted into the paint bottle.
This architecture makes use of the venturi effect.
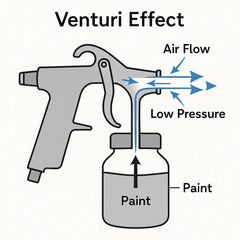
Because of this, paint must be thinner, the bottle must contain enough paint to submerge the tube, and the needle/nozzle alignment is essential for the venturi effect to form. These airbrushes also often require slightly higher air pressure and typically use a single-action trigger.
5 Steps For A Perfect Setup
Tip: I recommend watching the video embedded in the original post first, then reading all the details below for a comprehensive understanding.
Step 1 — Connect the 1/8" Hose and Check Airflow
Start by attaching your 1/8" air hose to the bottom connector of the airbrush. This is the standard size for most hobby compressors.
Turn on your compressor, press the trigger, and confirm that air is coming out of the nozzle.
If airflow is weak or uneven, check the hose connection, make sure there are no leaks, increase the PSI, or clean the nozzle tip.
Siphon-feed systems rely entirely on airflow to generate a vacuum, so this check is essential.
Step 2 — Prepare the Paint
Siphon-feed airbrushes need paint with lower viscosity than typical gravity-feed mixes.
Why? Because the air stream must physically lift the paint from the bottle, through the suction tube, and into the nozzle.
If the paint is too thick at any point, it won't rise in the tube, the spray will sputter or stop entirely, and the bottle will not "prime."
Mix your paint thoroughly until it flows like semi-skimmed milk.
Step 3 — Add Enough Paint to the Bottle
This is a common mistake for beginners using siphon bottles.
If you add only a tiny amount of paint, especially if you don't keep the airbrush straight during painting, the suction tube may sit above the liquid level, meaning no paint will be siphoned up, air will be drawn instead, and the spray will seem "broken" or "dry."
Always add enough paint so that the tube is completely submerged, and there is extra volume for consistent vacuum formation. Even for testing, add more paint than you think you need.
Step 4 — Insert the Needle and Tube Correctly
On this airbrush, paint travels through a feed tube that you insert into the bottle before attaching it to the airbrush, and then through a disposable needle.
The needle must be: fully inserted, straight, not bent or angled, and pointing directly upward.
If the needle is misaligned or slightly crooked, you won't be able to center it properly and you'll get either no paint or intermittent sputtering. Think of the tube and needle as the "straw" the airbrush uses — if the straw isn't straight, you won't be able to drink.
Step 5 — Attach the Bottle and Center the Needle
When you screw the bottle onto the airbrush, the needle must sit directly in front of the nozzle — not off to the side, and not too low or too high.
Otherwise, vacuum formation breaks: paint won't travel up, the venturi suction collapses, and you'll get airflow but no spray — which is the most common beginner issue with siphon systems.
After attaching, test the air and paint flow, and adjust if necessary. Once aligned, the airbrush is fully ready to use.
Final Thoughts
The DSPIAE Wash-Free Airbrush is a simple, robust, siphon-feed spray tool that delivers clean, continuous coverage with minimal hassle, provided the setup is done properly.
By following these five steps you ensure:
- Proper airflow
- Correct paint viscosity
- Reliable suction
- Correct needle/nozzle alignment
- Stable spraying performance
You can also understand why using bottles and especially needles in good condition can be critical to success. If you need additional needles, you can get them here.
This preparation process applies not only to this model but to all siphon-feed, single-action spray guns, making this knowledge universally useful for modelers transitioning from gravity-feed airbrushes.


